
Add Custom Fonts to Squarespace: using our Magical Tool
In this video, I introduce you to Custom Font Wiz, a magical tool I developed to make adding your own custom fonts to Squarespace faster and easier.
Add Custom Fonts to Squarespace
a.
Squarespace
b.
Video Walkthrough
Introduction
What if I told you that it's going to be a lot easier to install custom fonts to your Squarespace website? In this video, I introduce you to Custom Font Wiz, a magical tool I developed to make adding your own custom fonts to Squarespace faster and easier.
Whether you're customizing your own Squarespace website or you're a designer building sites for clients, CustomFont Wiz will be a huge time and energy saver. If you are selling Squarespace templates, you can now easily point your customers to this tutorial to make it easy for them to customize their templates.
Timestamped Overview
0:00 Introduction: Easier Custom Font Installation for Squarespace
0:08 Introducing the tool, CustomFontWiz
0:32 Benefits of using the magical tool for Designers and Template Sellers
2:14 Step-by-Step Guide: Adding custom fonts to squarespace
4:04 Which font format to use: woff2 vs woff vs otf
5:28 Importance of Font Licensing
6:45 Example of Using High-Quality Free Fonts
8:15 Uploading and Generating Font File Path
10:06 Applying Custom Fonts to Different Elements
11:56 Additional Tips for Efficient Custom Font Application
Why CustomFontWiz?
Squarespace has a wide selection of fonts available via the Site Styles panel, but there might also be fonts from great foundries you wish to install on your Squarespace website. What makes this tool magical is that it makes adding custom fonts to Squarespace incredibly easy and fast.
How to Use CustomFontWiz
Step 1: Fill Out the Form
All we need to do is fill out this form with the font details like font path and font name. Then we may choose to apply the font to the heading, the body, or the buttons and just choose the applicable font format.
Step 2: Copy and Paste the Code
Whatever code is generated in the right panel, we can easily copy and paste it into the custom CSS panel of our site. Upon saving, our custom font will now be applied throughout the instances of the element that we chose.


Step 3: Assigning Fonts to Elements
I assure you that this is the most efficient method out there because if we wish to use the same custom font on any other element of the website, all we need to do is head to the assign styles panel of our Squarespace site and choose the element where we wish to apply the custom font.
For example, if we want this custom font to be applied to the site navigation, I can choose the site navigation option under Assign Styles. If I choose the heading option, then our custom font will also be applied to this element.
Comparison with Existing Methods
You've probably watched countless tutorials on adding custom fonts, but these existing methods require writing new code. If you wish to install a custom font on specific elements, you'd have to spend time looking for the code and writing the code for every element where you wish to apply the custom font. This is why I developed this tool to make this process a lot easier.
Detailed Walkthrough of CustomFontWiz
Now allow me to walk you through the step-by-step process of how to use this tool. You can access the tool through this link.
1. Filling Out Font Details
Our first step is to fill out these details. The first field is where we'll supply the font file path, which is the link to our font file.
Check Font Licensing Details Before Using Custom Font
But make sure that before you use any custom fonts on your live Squarespace websites, you have the proper web license to use it. Note that the web license may be different from the desktop license, so if you obtained the desktop license, make sure that you also pay for the web license.
In some cases, font foundries also require annual payment for the font web licenses, so please make sure you check the fine print of any font that you use for your website.
There are also high-quality free fonts like these ones from Colletivo typefaces, and all they ask is for us to credit them when we use the fonts on our projects. There might be special cases, though, where this free license isn't applicable. So for every font that you use on websites, please make sure that you read the dedicated licensing pages.
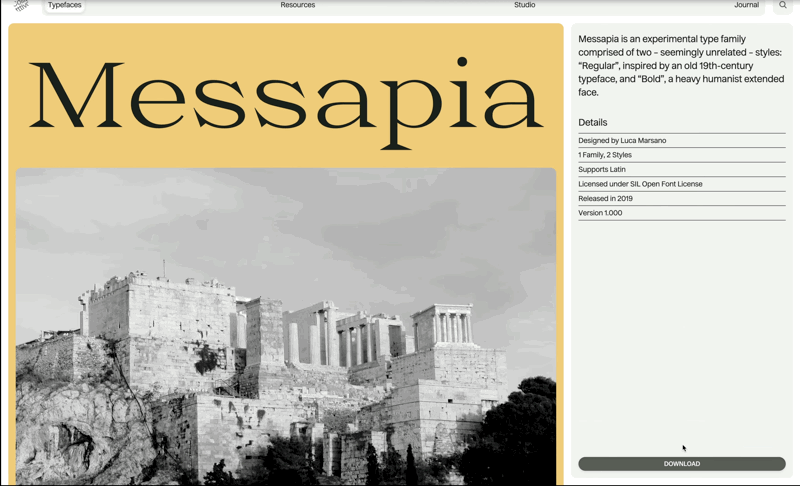
Example: Using Messapia
For example, I'd like to use this one called Messapia by Luca Marsano.
When we click the download button for this font, the downloaded folder contains desktop and web fonts.
For our use case, we need the web font, and for web use, the most recommended format is woff2, but if it isn't available, then we can use woff.
The font format OTF or OpenType is typically used for desktop, but then there are fonts, especially those from independent foundries or from Creative Market, that are only available via this OpenType format. And while the woff2 and woff formats are more optimized for web use, we can still use the OTF format. But then please make sure that you have the web license to use the font.
Once we have the font file and the proper web license, we may now proceed with generating the file path.
3. Generating the File Path by Uploading the Font File
To do so, we go to the CSS panel. We can click the search icon and start searching for CSS. Click the Custom CSS option.
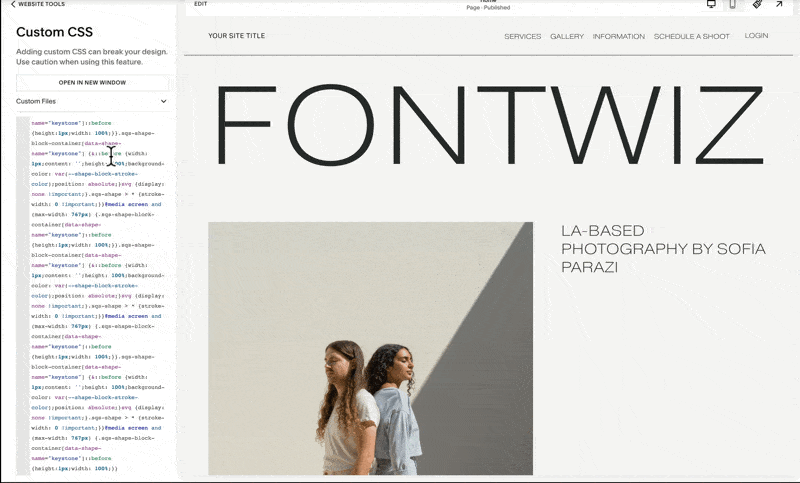
Should there be existing code in this panel, for example, this one, all we need to do is hit command arrow down on our keyboard or control arrow down if you are using a Mac computer. So that's command arrow down, and once we're at the very last line of the code, we hit enter thrice and this is where we can safely add any additional codes.
Don't worry about disrupting any codes because we will not save any changes that we'll do in this panel. We'll hit cancel in a while. We just need to upload the font via this custom files field.
So if I click this custom files dropdown, we will be prompted to add any images or fonts. We may use this plus button, or we may simply drag and drop the woff2 file. As I mentioned, because the woff2 file is the most optimized for the web, I am using it over the woff version.

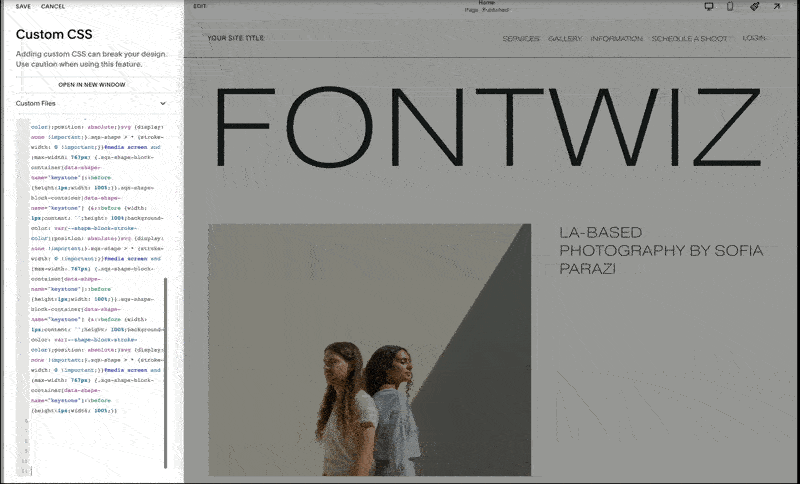
Once the font is uploaded, we may again place our cursor at the very end of our custom CSS panel, and once we click the custom files again and click the woff2 file that we just uploaded, notice how this custom file path is generated.
All we need to do is copy this link to our clipboard or our notes by hitting command c or control c, and then MAKE SURE TO HIT THE CANCEL BUTTON such that any of these changes will not be saved.
4. Applying the Font
Pasting the Code
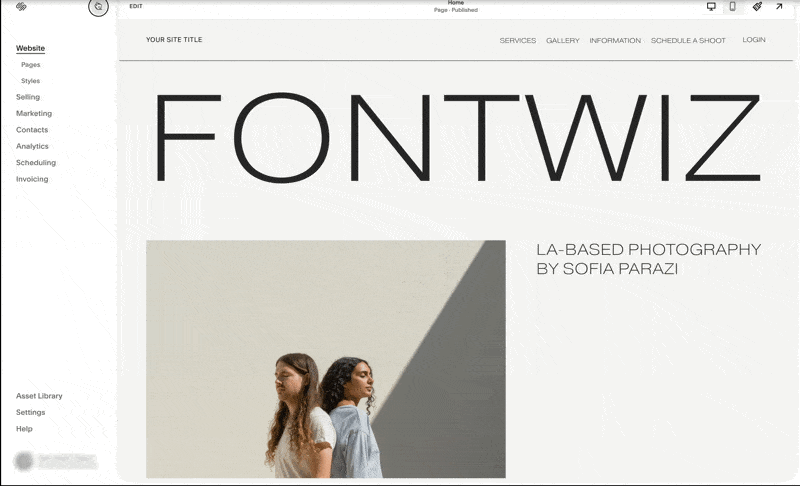
The link that we copied is what we'll paste to our font file path field and then we can assign any font name for this one. Our font name is Messapia and the element where I wish to apply this font is the heading and the font format right here is woff2.

Once I click the generate code button, it will supply us with the code that we can copy and paste to the custom CSS panel. Notice as soon as I paste this set of codes, the heading instances are changed to our new font style, which is Messapia. It's that fast and easy, and we just need to repeat the same process if we wish to have custom fonts for our paragraphs and buttons.
Customizing Paragraphs and Buttons
For example, if I wish to use this custom font as our paragraph and button font, I generated the font file path once again and assigned the font name. This time I'd like to apply it to the body or the paragraph. And then again using the font format woff2.
Here’s an example using Absans as font for body and buttons

So when I generate the code for the Absans font targeting the body, and copy this, if I paste it right on Custom CSS, notice that our paragraph fonts are now using the Absans font. I try to minimize the number of custom fonts for each website because each font contributes to the loading time. So in this case, I'd like to use the body font as my button font as well.
So I'll only need to repeat the same process and choose buttons as the element, hit generate code and copy then paste the same on Custom CSS, this will then now allow me to apply this custom font Absans to our buttons, and this font will now be applied to all button styles, primary, secondary, and tertiary.
Important Notes
Placing FontWiz Codes at the Start
Here's an important note.
If your custom CSS panel has existing codes, it's best for us to ADD THE CODES GENERATED by the Fontwiz tool TO THE VERY FIRST LINES of the panel.
To do that, we need to place our cursor at the very beginning and then hit the return key or the enter key multiple times. Twenty should be enough. And then whatever code is generated by Fontwiz, we simply paste it right here at the very start.
And if we need to add more FontWiz codes, simply hit enter and again these will be added at the start before any of the existing codes. We'll then save these changes and notice that our custom fonts are now applied.


Accessing and Assigning Custom Fonts
As I mentioned, if we wish to access these custom fonts, all we need to do is head to our site styles panel and under fonts, we click assign styles. We may choose the element where we wish to apply the custom font to.
For example, if I wish the Site Title to adopt our custom font for the heading, I'll switch to the heading font.
Notice how our Messapia font was applied, and if I want our custom font for paragraph or body to be applied, then I choose paragraph.
Advanced Typography Options and Applying Different Type Systems
There are so many more possibilities with regard to typography on our Squarespace sites if we just add a little bit of code magic. For example, we may also apply a different font style within one line such as this one. All we need to do is hit this italicize option to apply this accent font. This is something that I'll discuss in an upcoming video, so please make sure to subscribe to our channel.
It's also possible for us to apply a different type system to a specific page of the site. For example, in this website, I have this type system on one page and when I switch to another page, I applied a different type system. This is possible via code and this is something that I discuss in detail in my signature program, Standout Squarespace. You may check out the description link below.
Sharing and Additional Resources
Lastly, there is an optional step in our CustomFontWiz tool, and that's to share and subscribe. I highly encourage you to share this tool with other Squarespace business owners and designers if you find this helpful. This tool is actually one of the many new resources that we are preparing for the revamp of our Selling Squarespace Templates course. This course was originally available only inside the Standout Squarespace program, but it will now be available as a standalone course. So if you'd like to join the waitlist, simply click this button and fill out the details.
I hope you find the CustomFontWiz tool handy, and if you have suggestions on how to improve this tool, please comment down below. To receive updates on future resources on Squarespace, Shopify, and running your design business, please subscribe to this channel.